3.5. Awards - Details
An award in Pure is a record with information about research funding granted by a funder. If you would like the enter information about an Awarded application, please refer to the section AwardedCompetitive applicationProjects.
However, in certain cases, it may be necessary to create an Award without an Application.
To create a new Award:
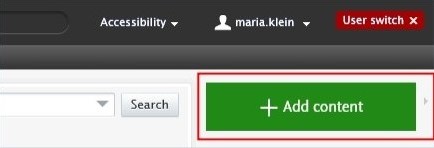
1. Click on Add content button:
Or click on the triangle next to Personal in the header, select Awards, and click on the ![]() button:
button:

2. Scroll down until you locate the precise type of the item you want to add.
3. In the Application editor window, you need to enter all available information about the item. The required fields are marked with a red star and filling them in is mandatory. To maintain data quality, we recommend providing information for some of the optional fields as well. The following steps include all the fields you suggested filling in.
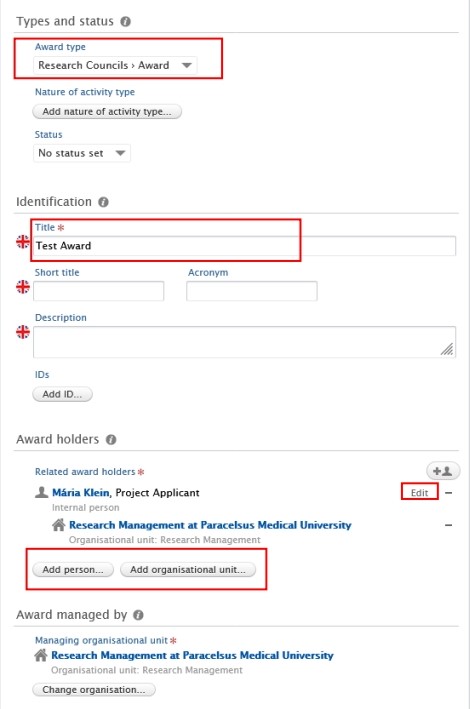
1. Award type:
The default type is Research Councils – Award. Use the dropdown menu if you want to select another type.
2. Title:
Fill in the title of the award.
Pure automatically adds the content creator with the PI role, along with their organisational unit, to this field. Click on Edit on the right side if you wish to change your role or your organisational unit. By clicking on the Add person button (left corner) or the add person icon ![]() (right corner) you can add other persons who are related to this application. Click on Add organisational unit if you wish to register additional organisations.
(right corner) you can add other persons who are related to this application. Click on Add organisational unit if you wish to register additional organisations.
4. Managing organisational unit:
Pure automatically adds the internal organisational unit of the content creator to this field. Change the organisational if you need to by clicking on the Change organisation button.
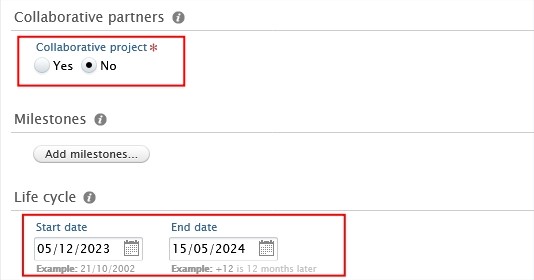
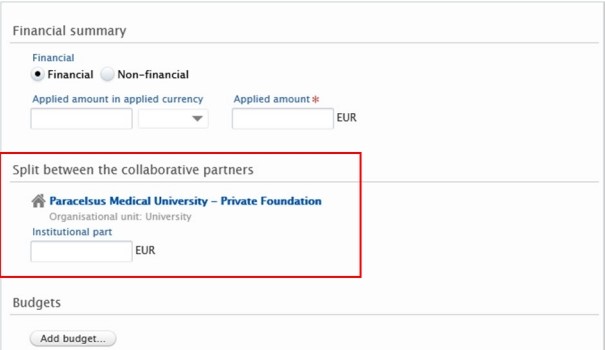
5. Collaborative award:
· Select No if the award is not a collaboration between partners.
· Select Yes if the application involves collaboration involving internal and external partners. By clicking on Add collaborator you can add further collaborators. Choosing Yes allows you to register the split between collaborative partners, which can be done in the Fundings field (see the next point).
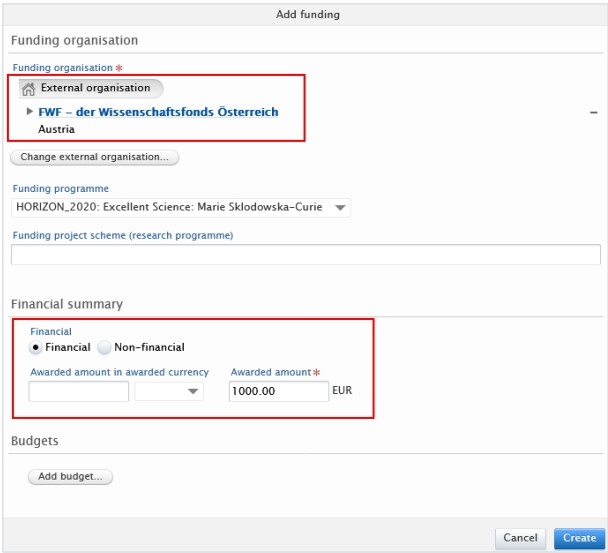
6. Fundings:
Here you can provide your content with information about funding organisation, financial summary (applied or estimated amount), etc.
· If you selected No in the Collaborative partners field (see point 5), you can manage the funding organisation, funding program, financial summary and add budgets as needed:
· If you selected Yes in the Collaborative partners field (see point 5), you can also manage split funding among project partners in addition to the fields mentioned above:
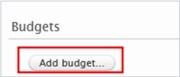
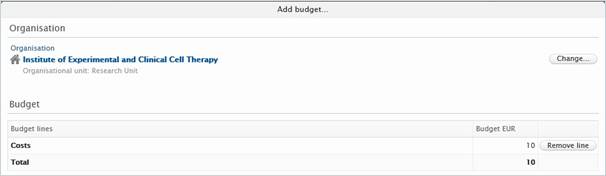
Optional: Click on “Add budget” in the dialog window if you need to register a split between internal organisational units:
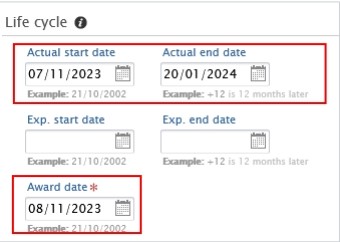
7. Actual start and end date and Award date:
Fill in the information about dates:
8. Optional: Relations:
You can link your applications with other Pure content, such as Projects.
4. Set the workflow status For Approval and click on Save:
![]()
In the next step, the application undergoes scrutiny by the RM. This involves a thorough review of the content to ensure accuracy and completeness. It's important to note that while we verify the overall correctness and adequacy of the information, we don't delve into the specifics, such as scrutinizing funding details.